Pages

Showing posts with label Adam's Handy Hands. Show all posts

Tuesday, 21 July 2020

Covid-19 and the basics of masks

As I've been running Adam's Handy Hands I've come across a lot of different clients. Some are super fit and healthy and others need a respirator to breath sometimes. To me it doesn't matter who you are, what you look like or what disability you have, I will treat you all the same and give you all the same level of service.

Now that covid-19 has hit I have done some serious research into how to prevent the spread from me to you, your family and your home. Wearing a mask is one of the simplest ways to protect myself from breathing in any germs and stopping my saliva from spreading. I also sanitise my hands before leaving my vehicle to kill any germs so I don't transfer them to your home. I also have a non-rinse sanitiser to use on any hard surface I touch, this sanitiser is proven effective against the coronavirus.


Along with the research I have done I have completed some online learning to further my knowledge on basic infection control of covid-19 and how to control the spread in the workplace (or at your home).


These two certificates cover covid-19 and how to control it. The first one is quite basic and covers basic control of the virus and is free and I encourage you to all complete it (it only takes 30mins). The second one is via Deakin Uni medical school and produced by DeakinCo. This one is more comprehensive and covers how to control covid-19 in your workplace, going through how you should wash your hands, proper wearing of your mask (putting them on and taking them off) and regular sanitising of regularly touched surfaces.

There are some basics to wearing a mask and I have seen many wearing them improperly. The basic blue mask (the one doctors wear) is a single use mask which can be used for 4hrs at a time. They are not intended to be put on and taken off more then once, once they are on that is it.

The masks with filters or N95 masks can be used for around 8hrs at a time before the valve is to moist from your breath and should be air dried. Some of these have 3 layers with the middle layer being a filter that can be changed after a couple of days use. These masks will filter out small particles and better protect you against the virus but are not intended to be washed and reused over and over.


One of the most common masks you will see are the painters dust masks. These are cheap, can be use multiple times (allow to air dry between uses) but don't really filter out any small particles. These are more designed for filtering out dust particles but can filter out the larger saliva particles that can be spread during normal talking. These ones typically have no valve so all the breath you breath out is trapped in the mask.


There is increasing popularity of fabric masks, these can come in a huge variety of styles and colours. They can have multiple layers and even a space to insert a filter. They have up to 3 layers of fabric to help stop the spread of any airborne germs from person to person. The more layers the better at stopping germs spreading from one person to another.


Lastly there are spray painters masks, these can filter out very small particles and germs with the right filters. These masks can be used over and over and have valves to allow any spend breath to be expelled into the air after going through the filter. These are the best at stopping the spread but are the most expensive and not practical for every day use. They should be limited to use where you need to see or be around someone that has a confirmed case or symptoms of covid-19.


Now I will go through the proper way to wear your mask so you give yourself every chance to not catch any covid-19 germs while out and about.

Before putting on your mask you should wash your hands (for at least 20 seconds) with soap and water (or use hand sanitiser if no running water available) so you don't contaminate you mask. This helps eliminate any chance of any bugs getting on your mask before it makes contact with your face. You should only touch it by the sides (the loops that go around your ears) as to not touch any of the part that covers your face.

After you take your mask off you should again wash your hands or use hand sanitiser as your mask will have come into contact with some airborne germs.

You should never lower your mask to sit around your chin or neck.

There will be germs that accumulate around your chin and will contaminate your mask. If you do need to take it off for any reason then it come completely off.

You should also make sure your mask has adequate pressure all around to have a good seal to provide the best possible protection. If it has a metal nose piece it should be presses tight to provide a tight seal so your breath doesn't end up fogging up your glasses.


And absolutely no peak a nose, your mask should cover your nose at all times to be effective.


I hope this information is useful to you and your family and you use it to wear a mask properly to minimise the spread. We don't want to have to go into stage 4 restrictions as that would mean almost all of us would be staying at home and my small handyman business will not be making any money.

Monday, 1 April 2019

Plaster repair in Melbourne

Plaster repair in Melbourne

Plaster damage can look quite ugly and turn away potential buyers, renters or AirBNB stayers. Here is how I prepare for and repair the damage, weather it be a crack or a bigger dent.

For any repair I always try to get a sample of the paint so I can get it matched.

Lets start with the basic tools and materials you may need for plaster repairs.

  • 100mm drywall joint knife
  • 125mm drywall joint knife
  • Knife or keyhole saw
  • Plaster compound (pre-mixed multi purpose joint compound is easy to use)
  • Paper joint tape or mesh tape
  • Spare plasterboard sheet (for dents/holes)
  • Thin timber for backing of replacement plasterboard
  • Sanding block/sandpaper (not very rough)
  • Paint brush
  • Paint Roller & tray
Joint Knife

Paper tape

Mesh tape

Plaster compound

Keyhole saw


For a small crack you will need to first need to sand the area smooth so your compound has a smooth surface to start with. If the crack has a bit of a gap then you will need to use either paper joint tape or mesh tape. I use mesh tape for longer cracks as it may be house movement and it helps to hold it together, and paper tape for smaller cracks to allow something for the compound to grab to.


With paper tape you will need to apply a thin layer of compound first for the tape to adhere to. Once you have the tape on the crack you will need to smooth it out and eliminate as much of the compound under it as possible so it is smooth and as flat as possible.

Once your tape is flat and smooth you can start applying your compound to the area. Apply it in small layers and make it as smooth as possible (this will help with sanding later). Apply your compound in alternating ways, up & down, left & right. This helps eliminate the air holes and small holes that may appear in the compound. You need to apply enough compound so you can't see the tape or crack, making sure to cover around 20mm wider then the damaged area so you can feather the compound later.


Once your compound is smooth, allow this to dry for at least 24hrs so all the layers are completely dry. After 24hrs and all layers are dry you can start sanding. You need to feather your edges until you feel no bump between the repair and original wall. Sand the rest of the area so it feels as smooth as possible without sanding through to the paper tape.


Once the area is sanded to perfection you will need to get rid of the sanding dust that has accumulated on the area. I use a cheap wide paint brush to brush away all the compound dust so the paint has a clean area to stick to.

Once the area is clean from sanding dust you can paint the area. For all plaster repairs I use a paint roller of a suitable size. I paint an area larger then just the repair so the repair is less noticeable, you can even paint the entire wall.

Now for a larger dent or hole you will need to have some spare plasterboard. If the dent looks to deep and you think it will take a fair bit of compound to fill then you will need to cut out a section of damaged area.


I use a keyhole saw to cut out a square or rectangle slightly larger then the damage as it is easier to cut a replacement square or rectangle. Cut a piece of thin timber slightly wider then the hole and screw it to the original plasterboard (this will allow your replacement piece to sit flush with the existing plasterboard). Make the replacement piece as close to the hole size as possible. If the replacement piece is very close to the hole size you won't need any paper tape around the edge.

If you have a gap where the compound will sink into to easily then you will need to apply some paper tape around the edges to allow the compound to adhere properly and not sink to much into the gap.

Apply the compound as mentioned earlier and paint the area. You have now repaired your plaster damage or if this seems to complicated and you think you don't have the skill to make it perfect, fell free to call or send me a message.

It should look like the damage was never there in the first place and the wall will be like new.


PH: 0419 393 179
Email: adam@adamshandyhands.com.au
FB: www.facebook.com/adamshandyhands

Monday, 17 September 2018

Mould removal in plaster

How to determine if you have mould in your plaster?

If you notice any dark irregular marks on your walls or ceiling keep an eye on them and see if they grow or more appear. If you have had a water leak then it can cause the plaster to get wet and insulation to soak up the water.

With the insulation being wet this will cause the plaster to stay wet and allow the mould to grow. The affected plaster and wet insulation needs to be removed and disposed of properly. The affected plaster and insulation should be placed in a garbage bag and straight into the bin, making sure you vacuum the dust straight away.


This ceiling area started out as a small patch, about the size of your fist. The client just painted over thinking it was a stain. After a few weeks the area grew to what you can see here. The mould could have been spreading harmful spores into the are and harming your family.

Once the cause of the mould (leak) had been fixed you will need to cut out and remove all the affected plaster. Even if the plaster doesn't have mould, it can be growing underneath, so make sure you remove more plaster then you think is necessary.


This is what was on the underside of the plaster, growing mould spreading unnoticed to the eye.

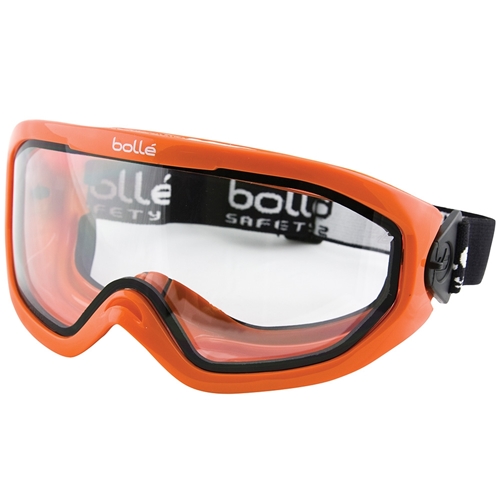
The first thing to do when tackling mould is to be prepared for the worst. Wear appropriate clothing and protective gear. Long sleeves, gloves, respirator (suitable for mould) and eye protection or face shield.


This respirator is for both airborne particles (wet and dry) and dust, it keeps out all particles that are harmful to you. 


These goggles help keep all the dust and harmful mould spores out of your eyes.

If you don't have any goggles you can use some glasses to protect your eyes. This basic safety equipment is needed to keep the harmful mould off you and stop you from breathing it in.

If you have a large drop sheet or something you can use to catch the dust it would be good, but not necessary.

Once you are prepared with all your safety gear you can start to remove the plaster and insulation. Once you have removed the affected area you can proceed to patch the area.

If you don't want to take the risk and prefer to get it professionally removed then you can call Adam's Handy Hands

PH: 0419 393 179
Email: adam@adamshandyhands.com.au
FB: www.facebook.com/adamshandyhands

Monday, 18 June 2018

The dangers of mould!

Mould can be very dangerous and can spread bad spores into the air. It can be very dangerous to breath in the spores. All precaution is needed to remove any mould in plaster.

Before any work commences on treating the mould you need to make sure that the source of and how it go there has been fixed. Whether it be a leaky roof or not enough ventilation in the walls, allowing the build up of water in the wall. You may not have enough ventilation in your bathroom, causing the steam to affect the ceiling.

You need to remove all the contaminated/wet plaster and any insulation that is wet. The insulation may not look contaminated but since it is wet it can still grow some mould and will affect the plaster patch.


This is a recent plaster repair I had to do that had a lot of mould. The client said they just painted over the area to try and cover the discolour. They said it just came back and that the mould has been spreading. I had to remove the entire affected section and the soaking wet insulation.


This shows how wet the plaster was and how easy it was to poke through. I could just poke my finger through without any force, meaning that the plaster could have fallen at any stage.

I had the affected area removed, which was bigger then it looked. The underside of the plaster (the side up in the roof) was very wet and starting to get mouldy. 

This shows how bad the plaster was and it was just falling away as I removed it. It's the worst I have ever seen and was in a bedroom, which is the worst as you spend about 8hrs there breathing in any mould spores in the area.


Upon further inspection I found that one of the roof tiles was cracked, so that will need to be replaced before any further work commences.

With the bad weather it had to wait until it cleared to get on the roof to replace the tile and have the plaster repaired.

This is s lesson to all that mould can be very dangerous and you should get professional help to deal with it. If left untreated or not removed completely it will most likely come back. You can't simply just paint over the area with normal paint, you need to use mould inhibiting paint or the best options is to remove the affected plaster and replace it with fresh plaster.

If you notice anything that resembles mould you should consult a professional to inspect it and have it treated properly. I can always inspect affected plaster and treat it to remove the mould. If it is in a bedroom it is best to limit the use of the room until it is treated or removed.

Always remember to be protected when doing his sort of work, wear a dust mask and rubber gloves.


PH: 0419 393 179
Email: adam@adamshandyhands.com.au
FB: www.facebook.com/adamshandyhands.

Friday, 11 May 2018

What can Adam's Handy Hands do???

Adam's Handy Hands isn't your ordinary handyman service, we do a lot of different jobs. We are always learning new skills, doing short courses and assisting experts on complicated jobs.

We assemble flat packs, mount TV's, washing machines, dryers to plaster and masonry walls, repair plaster damage (including painting), install doors and door locks (including digital locks), assembling and maintaining bicycles and more.

Some great jobs include, installing window awnings to provide some needed shade and cooling to the front rooms, installing a door and door frame to make a garage more secure and creating a free library


It great to see the end result of a perfect job, or in the case of a plaster repair not seeing the repair. I love getting to the end result, seeing that finished result and hearing from the client that they love the job I have done.

Thursday, 10 May 2018

Gutter cleaning maintenance

Your gutters are an integral part of your home, they allow the rain water to flow from your roof into the down pipes. Your gutters also prevent the water just flowing off your roof destroying your garden.


Preventative maintenance helps clear the buildup of leaves and dirt to allow the water to flow nicely. With a build up of leaves and dirt it can cause the rain water to build up, potentially flowing under the eaves causing damage to your ceiling.

The cost of having your gutters maintained is minimal compared to having your ceiling replaced (which could be hundreds or even thousands). It is best to have your gutters maintained once every 6 months to eliminate the build up and keep your gutters flowing like a stream.


If you can see anything growing from your gutters then they are overdue for a clean.

Contact Adam's Handy Hands for a free quote
PH: 0419 393 179
Email: adam@adamshandyhands.com.au
FB: www.facebook.com/adamshandyhands
Linkedin: Adam's Handy Hands

Tuesday, 13 March 2018

What can Adam's Handy Hands do?

Adam's Handy Hands started out just assembling flat packs. It was something I could do and I already had the necessary tools for the job.

There wasn't much of a need for that sort of work and it was becoming a bit repetitive, so I decided to expand and start doing more complex jobs. I started to do picture hanging, researching many of the types of hooks and anchors out there.

I broadened my skills and learnt to do plaster repairs, deck staining/oiling and replacing polycarbonate roofing. I wanted every day in my business to be different and have a bit of a challenge in the work I do.

Since starting my business I have assembled a lot of flat pack furniture, hung many paintings, TV's and mirrors, repaired and painted lots of plaster damages, replaced polycarbonate roofing, cleaned gutters and replaced a front loader washing machine seal and installed some window awnings.


Picture Hanging

Mounting TV's

Replace the seal on a front loader washing machine door

Create a nice safe balcony for an indoor cat to go outside but not climb over and escape

Replaced old and sun bleached polycarbonate roofing

Polycarbonate roofing looking so much better

My latest work, some window awnings to reduce the sun getting into the front rooms of the house.


I'm still learning every day and expanding my knowledge, taking the challenge to learn new skills and enjoy the different things I do in my business.

With my ever expanding knowledge and strive to keep on learning it is easier to ask me if I do the work, rather then asking what I can do. The list will be too long and I may miss something.

Don't hesitate to get in touch for any jobs you may need done.

PH: 0419 393 179
Email: adam@adamshandyhands.com.au
Facebook: www.facebook.com/adamshandyhands

Wednesday, 7 March 2018

Window awnings.

Recently I installed some window awnings to block out some of that harsh sun and reduce the heat in the home. It was hard to find the right ones that suited the rest of the house and that the client actually liked.

Once the awnings were ordered and delivered I had the task of cutting them to size and installing them over the windows. The front of the house was quite boring with the front door being hidden down the side.


These awnings come flat packed with minimal instructions and many timber pieces to cut and install. Once I had my head around the instructions and what each piece was, it went along quite smoothly.

They were quite easy to install with very little trouble. It makes the front of the house look more complete and the windows pop. They also add the needed cooling to block out some of the sun from the house.


As you can see it has really finished off the front of the house. making it look complete.


If you like to look of this then I can help, I can source and install many different types of awnings to suit many different types of homes.

Don't hesitate to contact me for a quote.
PH: 0419 393 179
Email: adam@adamshandyhands.com.au

Monday, 8 January 2018

Australia Day

With the new year just a memory and Australia Day just around the corner, now is the time to spruce up your home.

Do you need some more storage to help keep your place tidy, a bigger dinning table for that upcoming party or maybe you want to replace that fading and deteriorating polycarb roof.

I can have that flat pack assembled or polycarb roof replaced, leaving you to spend time with your family or leave you time to cook dinner. While you spend time with your family, cook dinner or put your kids to sleep, I can have your flat pack assembled or polycarb roof replaced.

I can also install some new polycarb roof on existing pergola to give you that amazing outdoor area, making it extend your dining outside.

With your new polycarb roof installed you can have your friends over on those great Melbourne summer days to enjoy a great BBQ with friends. You don't have to be afraid or embarrassed to have friends over looking at that faded and deteriorated roof.

Feel free to send me a message.

www.facebook.com/adamshandyhands
adamshandyhands@gmail.com
PH: 0419 393 179

Monday, 4 December 2017

Gutter cleaning

Whether it is summer or winter blocked gutters can cause a problem. In winter there can be more rain causing a backlog of water, this can lead to your ceiling leaking and damage to your contents.


In summer, even though there might be less rain the leaves and sticks can be a fire hazard. With this it can lead to part/all of your home burning down. This can cost you a fortune to repair.

The repairs to your home from blocked gutters can quickly get into the 1000's, but a simple gutter clean can be a little as $300 and save you the hassle of more repairs.

I take the hassle/potential accident out of cleaning your gutters, I come and professionally clean your gutters, making them flow like new. They should be cleaned once every 6 months to make sure they are kept clean for when the storm hits.

I keep track of when it was last done and can send reminders, so all you have to do is relax and not have to worry about your gutters again.

Monday, 15 May 2017

Diy fails

There are so many DIY repairs and jobs that can seem easy enough to do but take some skill and practice to perfect, and don't forget the price of the tools.

Some DIY jobs can be dangerous if the correct precautions are not taken and injury can follow. With the right tools, knowledge and safety precautions you can lessen the chance of any injuries.


Some of you may remember Home Improvements from the early 90's until 1999. You may remember Tim "The Toolman" Taylor (Played by Tim Allen) and the many times he failed at his DIY project. Learning from this it is best to leave the home improvements/repairs to the experts so you don't end up like Tim Taylor.

I have the tools, knowledge and experience to lessen the chance of any injuries happening and it saves you from any injuries. I have spent the money on the right tools for the job to make it easier for the job to be done perfectly.

If you want a professional job, don't have the tools or just don't want to risk injuring yourself then I can help you out.

Wednesday, 10 May 2017

Perfecting plaster repair

Repairing plaster to look like it was never damaged is an art form. You need to prep the area first, roughly sanding it, removing any major bumps. This allows the base coat to go onto a smoother surface.


With this repair it was only cracked and just needed to be plastered over. You need to first apply a layer of mesh joint tape to help support the crack and to stop it spreading. Then you can apply the base coat going wider by about 50mm to allow you to taper the edge for a perfect finish. Once you have applied 2 coats of base coat you need to let that fully dry.


Once your base coat is dry you need to roughly sand it getting it near smooth to allow your top coat to go on nice and smooth. Apply your top coat, covering the base coat completely. Allow your top coat to dry for at least 24hrs before sanding and painting.


Once your top coat has dried for at least 24hrs you can now sand it perfectly smooth. It needs to be as smooth as you can so your paint goes on perfect.

If you have any plaster that needs repair you can contact me on
PH: 0419 393 179
email: adamshandyhands@gmail.com
FB: www.facebook.com/adamshandyhands